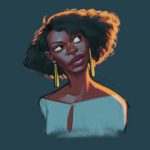
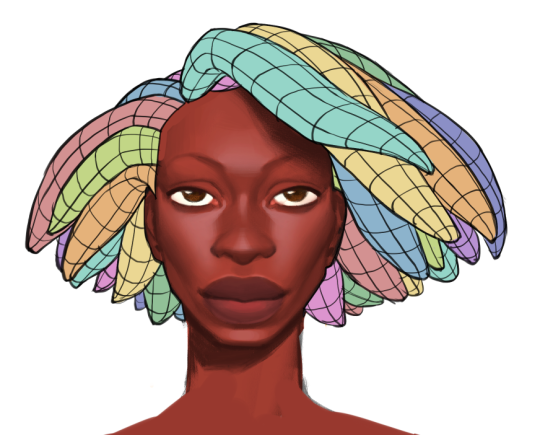
Zora is one of the two main characters in our second game, In the Valley of Gods. Quite a few people remarked on Zora’s character design, in particular her hair, when they saw our announcement trailer. Indeed, creating Zora’s hair is a challenging problem for intertwined technical and cultural reasons. I would like to talk about our explorations and aspirations so far, and why it’s important to us we get it right by the time we ship.
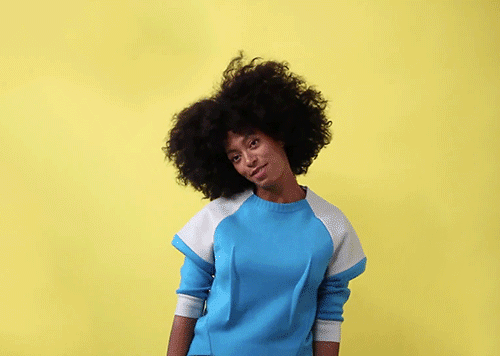
In 2015, Evan Narcisse wrote an important essay on natural hair and blackness in video games. You should read it. It was the first time I’ve really thought critically about hair and representation in video games, and the yearning in the piece struck me.
Hair is very personal. As an immigrant woman of Chinese descent with atypically frizzy wavy hair, my hair is, to an extent, an outward expression of my struggle with who I am and where I belong (or don’t). I want to love my hair the way it naturally is, but it’s never quite simple as that.
So when I first saw the character design for Zora, I had an understanding of what task lays before us as a team. None of us has Type 4 hair, characterized by tight coils and common among black women. In fact, none of us have even made video game hair before, but we are committed to giving Zora the hair she loves, the way she chooses to wear it, with all the care and effort we can.
Building Zora’s hair will be a continual effort that lasts the whole project. Our first milestone for the hair was getting it in shape for our announcement trailer, when Zora was first introduced to the public.
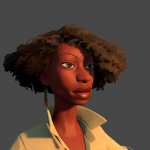
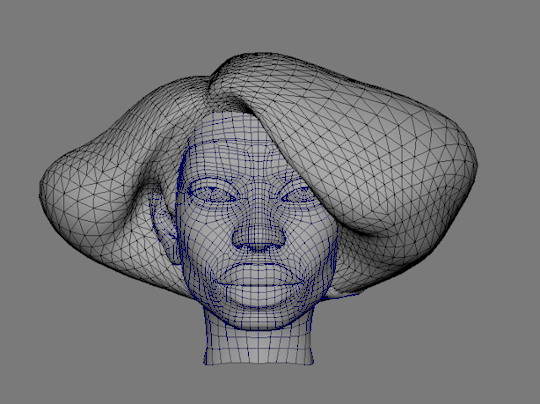
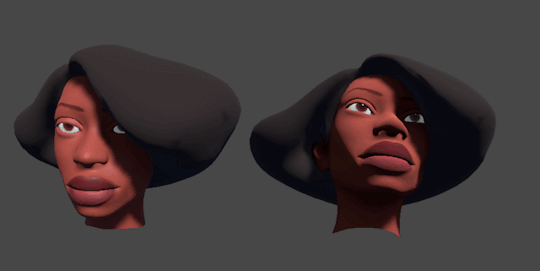
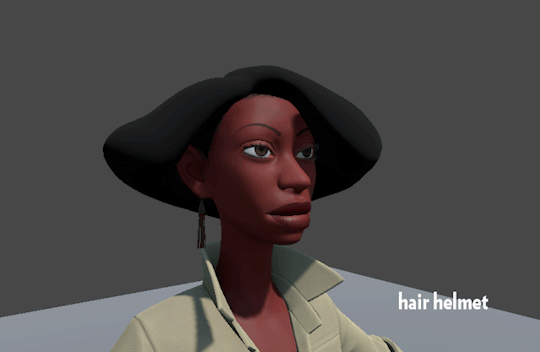
As a small team without a dedicated character modeler, we hired a couple of specialists to do Zora’s character sculpt. Their task included sculpting a static version of her asymmetric bob so we could evaluate the scale and silhouette of her whole body. We knew the static sculpt would serve only as a placeholder and reference while we figured out a longer term hair solution.
Hair is a complicated combination of geometry, shader work, and texturing, and it requires a very tight and frequent iteration loop to get right. It made sense for us to do it in house even if we haven’t created hair before. The task of modeling “good enough, first pass” real-time hair for the trailer fell to me; the shading and rendering work to our graphics programmer Pete; and the copious texture and oversight work to our art director Claire. We started by investigating what other developers have done.
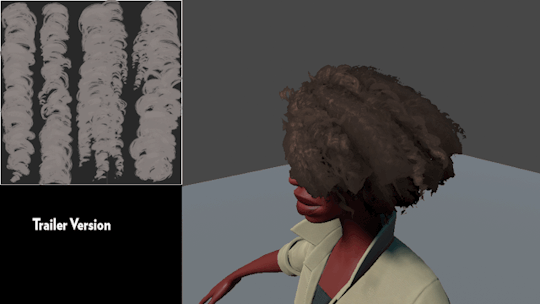
Real-time hair geometry, as far as I can tell, falls into two broad categories: “hair helmets” and “hair cards.” A hair helmet is what I call completely opaque geometry, as one would see on a plastic action figure or Lego figurine—think Princess Zelda’s hair in The Legend of Zelda: Breath of the Wild. Hair cards, on the other hand, use many sheets of hair strands to portray more free-flowing hair —think many characters in Uncharted 4. That approach is well suited to hair types that can be abstracted into sheets, which works well for any length of straight hair. There are also hybrid approaches, such as this wonderful tutorial of a game-ready afro by Baj Singh.
Claire designed Zora’s Type 4 coily hair to have a lot of texture and volume, but it also has a “big-chunky-tubes” structure allowing fluid “floppy” movement. Neither of the two previous approaches is ideal for Zora’s hair.
The closest in-game hair reference I found is Nadine Ross from Uncharted 4, but on closer inspection Nadine has Type 3 hair with very defined curls, quite different from Zora’s tighter Type 4.
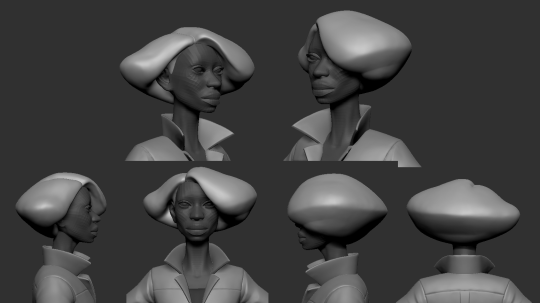
Sometimes the only way to solve a problem is… just by making something, even if it sucks in the beginning. So I started off with a variant of the hair cards approach by making “big tubes” of three cross-cards to follow the shape and flow of Zora’s hair helmet sculpted by Ted Lockwood. It was important to have some geometry that remotely resembles what we will ultimately create, to test the shader Pete has been writing.
I would work on the hair for a few days at a time whenever I wanted a break from creating the trailer’s environments. After two months of wrangling various placements of polygon tubes, flat cards, and cross-cards, as well as bending all their normals as if her hair were a shrub, we had the following result as of October 2017.
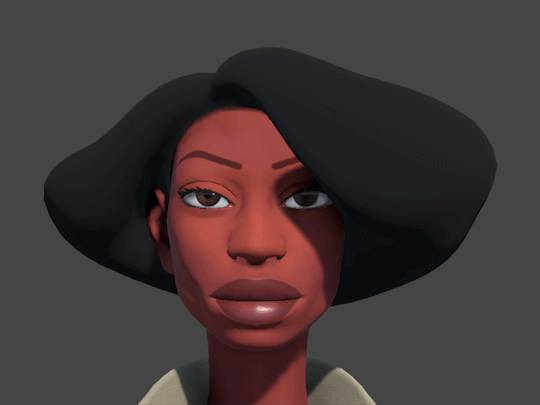
Part of the challenge of all this is that not only are we making Type 4 hair, we are making stylized Type 4 hair that evokes Claire’s distinct style. It became clear very early that the way Zora’s hair interacts with light would be a key part of the shader work.
I’m not able to go into the technical details of the shader in this post, but we ended up adding individual controls for each type of lighting we wanted the hair to respond to, based on Claire’s specific concept art: for instance, light striking from the back, from the side, ambiently, and so on. This got finicky, but taught us a lot and provided enough variation to create the trailer. It will take much more experimentation and iteration for the hair to behave according to the style guide under all necessary lighting conditions, but making the trailer gave us a lot of direction for our next steps.
Right now, we have an intensely stylized back-scatter effect in the hair when backlit, but we still lack the ability to do high-quality rim lighting without relying heavily on post-processing.
We are currently only using alpha-cutouts for the hair cards (alpha sorting is a whole different topic outside the scope of this post) and I’ve been advised by character artists that some number of alpha blend cards for flyaway hairs usually works well.
For the trailer, James rigged Zora’s hair and hand animated the movement, but we plan on applying physics simulation to the hair rig for the shipping game.
There is a long way to go before we’re truly happy with Zora’s hair, but this is a good first step. As the rest of the game’s visuals become more solidified, it will become more clear what we need to tackle next.
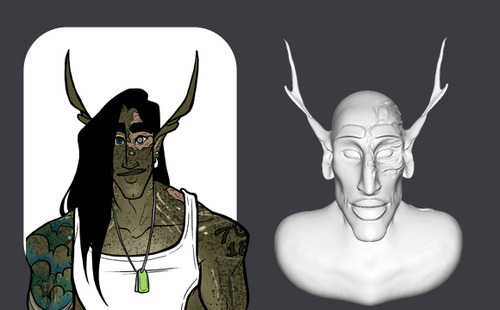
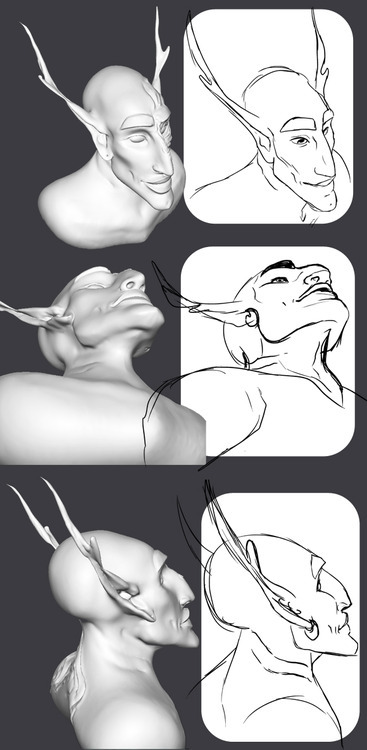
The program is called Sculptris and is a free off-shoot program from Zbrush, that program that you keep hearing about but either takes selling your kidneys or piracy to actually use.
If you download it and sculpt out a facial model, you can have references for your own work for all of time. No more endlessly searching Google for reference materials or twisting/rotating/flipping a drawing to see if there are flaws. And you can easily edit it to create more facial types. This way, you can make character references for any and every face and facial angle that you can think of.
The program offers mirroring right from the start, so your faces will be perfectly symmetrical. You can turn off the symmetry for things like scars or otherwise.
It takes a little time. For instance, I downloaded the program on Christmas and, in my spare time, this took a few days of getting familiar with the program (first day) and then sculpting for a few minutes each day, mostly due to my perfectionist nature. And this one isn’t even done. I still have to mold the mouth, ears, and other smaller aspects before I consider it done. However, I was so giddy over the possibilities that I wanted to share this with my fellow artists.
From now on, I have reference for a face in my own style and will be able to create things so much easier in the future.
I hope that this helps you guys and that you have fun with it.
I absolutely recommend Sculptris!
UH
GUYS????
This really useful oh my goodness. It takes a little figuring out, but once you get the hang of it it’s actually pretty easy. Just watch a couple youtube videos. Seeing how other people do it helps you to make sense of it.
OH BOY LOOK AT THIS HANDSOME SILLY do you know how hard his stupid face is to figure out at different angles? DO YOU??? Now I have a 3D ref!!! AAAHH!! so excite much 3d wow very angles wow
I’ve said this before and I’ll say it again: sculptris is an amazing 3D modeling tool for how small it is and is a great place to start whether you just want drawing references for your characters or you actually want to get into 3D modeling.
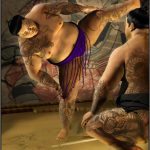
[Image Description: A 3D rendered illustration of two sumo wrestlers who appear to also be Yakuza members. In the foreground, one wrestler squats before his opponent, wearing a black mawashi (loincloth) and his visible leg, arm, and back are heavily tattooed. In the midground, his opponent has his left leg raised high, ready to stamp it down to the ground. He is wearing a dark blue mawashi with long pieces of fringe, and his arms, chest, and legs are also heavily tattooed with dragons, flowers, and billiard balls. The background of the image is of a sumo ring, with a backdrop of traditional Japanese paintings. Both men look very powerful.]